All posts by ajohnson

Struts ActionForm validate() question

I’m trying to setup a simple contact us form that gathers information from a user, checks that the information is valid and then emails the information off to a third party using Struts v1.1, specifically an ActionForm and an Action. In my struts-config.xml, under <action-mappings>, I have this:

<action
  path="/contact/requestinfo"
  type="com.mycompany.actions.RequestInfoAction"
  name="requestInfoForm"
  scope="request"
  validate="true"
  input="/views/requestinfo.jsp">
  <forward name="success" path="/views/requestinfo_confirm.jsp"/>
</action>
    

and then obviously a <form-bean> definition above that. What I expected to happen was that the initial request would be forwared to the page specified by the input attribute, the user would then submit the form, the validate() method would be called on the ActionForm instance, and then if the validate() method return no ActionErrors, the form would be passed on to the Action. What happens instead is that the validate() method is called on the ActionForm before the user even submits the form, which causes the error messages (“First name is a required field.”) to be displayed before they have even submitted the form.

In the short-term, the workaround is to define an action mapping that simply forwards the user to the input page and then a second mapping that has the validate=true attribute set, so the page flow looks like this:

/contact/requestinfo –> display form –> submit form –> /contact/requestinfoform –> validate() –> if no errors, then servlet forwards to the Action

Is there a way to have to validate() method not called on the intial load of the page? Any thoughts?

Hibernator

From the Hibernate Related Projects page, Hibernator is an Eclipse plugin for Hibernate.
Download and install the plugin and it will automatically generate hbm mapping files from existing Java source files (open up the source in question, then go to Window –> Show View –> Other –> Hibernator) and can also be configured so that you can run run Hibernate queries in real time (I couldn’t get that feature to work, it won’t find my persisted classes).

Hibernate Code Generation

Justin left a comment about various tools for generating Java code from XML. Last week while I was reading about Hibernate I was interested to read that the same files you use to persist POJO’s to a database using Hibernate can be used to create the Java objects as well. It’s reasonably well documented on the hibernate site, but doesn’t include all the classes you need on the classpath, so here’s an example from my system:

java -cp C:\hibernate\hibernate-2.1\hibernate2.jar;
C:\hibernate\hibernate-extensions-2.1\tools\hibernate-tools.jar;
C:\hibernate\hibernate-2.1\lib\commons-collections.jar;
C:\hibernate\hibernate-2.1\lib\commons-logging.jar;
C:\hibernate\hibernate-extensions-2.1\tools\lib\jdom.jar net.sf.hibernate.tool.hbm2java.CodeGenerator Resource.hbm.xml

where Resource.hbm.xml looks likes this:

<?xml version="1.0"?>
<!DOCTYPE hibernate-mapping
 PUBLIC "-//Hibernate/Hibernate Mapping DTD//EN"
 "http://hibernate.sourceforge.net/hibernate-mapping-2.0.dtd">
<hibernate-mapping package="com.mycompany" auto-import="false">
 <class name="Resource" table="resource">
  <id name="id" type="int" unsaved-value="0" >
    <column name="id" sql-type="int" not-null="true"/>
    <generator class="identity" />
   </id>
   <property name="label" type="string" />
   <property name="filename" type="string" />
   <property name="teaser" type="string" />
   <property name="type" type="string" />
   <property name="url" type="string" />
   <property name="datetimecreated" type="date" />
   <property name="datetimemodified" type="date" />
   <property name="createdby" type="string" />
   <property name="modifiedby" type="string" />
   <property name="active" type="integer" />
   <property name="archive" type="integer" />
 </class>
</hibernate-mapping>

This will automatically create a JavaBean, with full and empty constructors, getters and setters for all the fields, a toString() method, an equals() method, and a hashCode() method. Additionally, you can use an external configuration file to add an interface that the bean implements, change the rendering mechanism, the package, etc.

Cooler still, you can go backwards and create Hibernate mapping files directly from your existing compiled classes using the net.sf.hibernate.tool.class2hbm.MapGenerator.

Ant & Tomcat Manager on virtual hosts

I’m kicking out a couple freelance projects using Struts and Hibernate in the next couple weeks, this weekend I was fiddling with the Ant build script and I remembered Tomcat Manager App, which allows you to reload contexts while Tomcat is running (as well as start, stop, install etc..). Unfortunately, the /manager application only sees applications within the virtual host it’s running in and because I’m working with a couple different applications, I have multiple virtual hosts and I need to be able to utilize the /manager application from each one.

Turns out it’s not all that hard to get the /manager application working within a different virtual host… as long as you read the documentation very thoroughly. It’s as simple as adding this:

<Context path="/manager" debug="5" docBase="${CATALINA_BASE}\server\webapps\manager" privileged="true" />

(where ${CATALINA_BASE} is the absolute path to your tomcat install) to the virtual host element you have setup in server.xml (for those not experienced with Tomcat, adding a ‘context’ is similar to adding a virtual directory in IIS, make any more sense?). The one gotcha (in bold) is the privileged attribute. It *must* be set to true to run the /manager or /admin applications in virtual host besides localhost.

Reloading the application using Ant is a breeze, the Tomcat documenation includes an example build file, in short all you need is this:

<property name="path" value="/myapp"/>
<property name="url" value="http://localhost:8080/manager"/>
<property name="username" value="myusername"/>
<property name="password" value="mypassword"/>
<taskdef name="reload" classname="org.apache.catalina.ant.ReloadTask"/>
<target name="reload" >
<reload
  url="${url}"
  username="${username}" password="${password}"
  path="${path}"/>
</target>

Make sure that you have the catalina-ant.jar file coped from {Tomcat_install}\server\lib\ to your {Ant_install}\lib. If you are using Eclipse, go to Windows –> Preferences –> Ant –> –> Runtime –> Classpath and add catalina-ant.jar to the Runtime classpath.

.NET, Reflection and multiple assemblies

As part of a project I worked on at Mindseye, I wrote a couple utilities using C# that used reflection to query a given type for the existence of a method and if the method existed, to then invoke the method. In short, the utility allowed me to do this (pseudo-code):

AbstractType type = AbstractTypeFactory.Find("com.company.SomeClass");
string result = type.InvokeMethod("delete");

The AbstractTypeFactory type has a single static method ‘Find()’ that looks for the given type by name. If successful, it returns an instance of AbstractType, which you can use to invoke a given method on the type you looked up using the InvokeMethod() method. The InvokeMethod() method checks to see if the given method is a static or instance method, creates an instance if necessary, and then calls the method.

These utilities worked fine until I need to call the Find() method against a type that wasn’t in the same assembly as the assembly that my utility was in. Inside the AbStractTypeFactory (which is a pseudo-name by the way), I used the .NET Type class:

// Gets the Type with the specified name, performing a case-sensitive search.
Type type = Type.GetType("com.company.SomeClass");

I didn’t have time to look into why the GetType() method wouldn’t find types outside of the currently assembly… until today when I really needed to be use the utilities against a different assembly. It turns out that it’s relatively simple to do. Instead of using the type name (ie: “com.company.SomeClass”), you can use the AssemblyQualifiedName, which looks likes this:

com.company.SomeClass, assemblyname, Version=0.0.0.0, Culture=neutral, PublicKeyToken=null

where assemblyname is the name of the DLL that com.company.SomeClass exists in. It’s relatively easy to retrieve the AssemblyQualifiedName using the AssemblyQualifiedName property of the Type type. For example, the .NET documentation gives this example:

Type objType = typeof(System.Array);
Console.WriteLine ("Qualified assembly name: {0}.", objType.AssemblyQualifiedName.ToString());

There are alot of good reasons why Microsoft designed the GetType() method the way they did, the majority of them related to how the runtime locates assemblies, which you should read about when you have a alot of time.

ColdFusion & log4j

Integrating log4j and CFMX - An open source Java project gives developers new capabilities The January issue of ColdFusion Developer’s Journal features an article I wrote on how to integrate ColdFusion and log4j entitled “Integrating log4j and CFMX – An open source Java project gives developers new capabilities”. You can read it here.

While not especially interesting for developers writing simple ColdFusion applications, I’m finding that log files are becoming especially useful in applications with multiple tiers and clients. Even if you don’t use log4j and ColdFusion, I’d suggest taking a long look at your application to find out where it might be helpful to make your application more transparent.

Instant Messenging with ColdFusion, Jabber and Smack

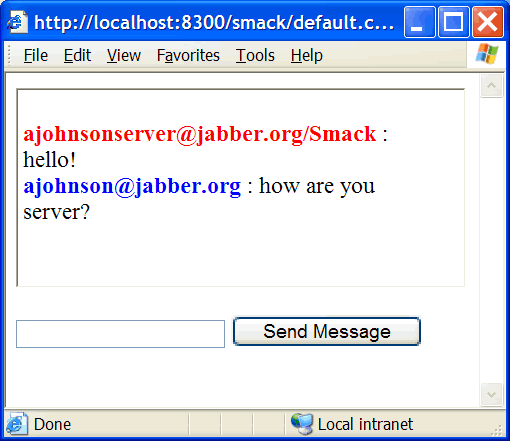
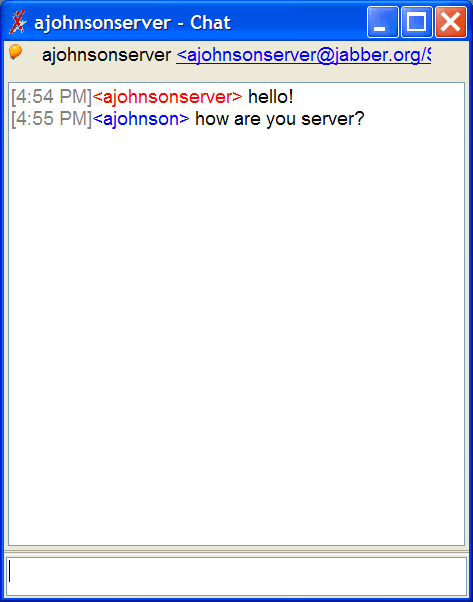
I noticed a couple different people wanting information on instant messenging with ColdFusion and then in another place instant messenging with Jabber and ColdFusion in the last couple days (for reasons beyond me) [first on cfguru, then on my blog, then on the jive software forums]. For those that care I put together a quick and ugly web-based instant messenging interface to Jabber using an open source Java library called Smack. You can download the source code at the end of this article or follow along as I describe the process.

Setup: 1) You need to download the Smack library and place the smack.jar and smackx.jar files into a directory acccesible to ColdFusion (commonly /WEB-INF/lib/). 2) You need to setup a couple Jabber accounts. You can either download, install and run your own jabber server or create a free account on jabber.org (or one of the many other public jabber servers). 3) You need to get a Jabber client (I’m using Exodus).

There are 2 (technically 3) parts to the interface. The easiest is a standard Application.cfm that creates an application that enables us to use sessions. You need sessions because you need to be able to persist the Jabber chat and connection objects across requests.

The second part is composed of 2 documents: a) the default page that presents a form for sending a message and has an iframe to hold the conversation and then b) the iframe that holds the conversation and then initializes the Jabber connection and chat objects. I’ll show the iframe first.

The iframe is split up into 2 parts: initialization and display. The first thing it does is check to see if the connection object exists in session scope:

// if no connection exists, create one
if (NOT structKeyExists(session, "connection")) {

If the connection doesn’t exist, the following block of code is run:

// create a connection to the jabber.org server
XMPPConnection = createObject("java", "org.jivesoftware.smack.XMPPConnection").init("jabber.org");
// login to the jabber server
login = XMPPConnection.login("username", "password");
// create a chat w/ another user
chat = XMPPConnection.createChat("user@domain.com");
// store the connection and chat objects in session scope
session.connection = XMPPConnection;
session.chat = chat;
// init an empty string to hold the conversation
session.conversation = "";

The block above creates a Smack XMPPConnection to the Jabber server (in this case I’m using ‘jabber.org’, but you should change this to be whatever server you have an account on). Next I call the login(username,password) method to login to the Jabber server and then I create a Smack Chat object by called the createChat() method on the connection. Because I need the chat and the connection to persist (in order to chat with someone), I store both in session scope. Finally, I create a session variable called ‘conversation’ that will store the conversation between the 2 chatting clients.

If the connection already exists in session scope, another block of code is run:

// get the connection & chat objects from the session
connection = session.connection;
chat = session.chat;
// retrieve the message using pollMessage() (which is nonblocking)
nextMessage = chat.pollMessage();
// if no message exists 'nextMessage' will be undefined (I think 'null' technicall)
if (IsDefined("nextMessage")) {
  // message does exist, add it to the conversation
  session.conversation = session.conversation & "<br /><strong><font color='blue'>" & chat.getParticipant() & "</font></strong> : " & nextMessage.getBody();
}

I retrieve the Smack XMPPConnection and Smack Chat objects from the session, and then call the pollMessage() method on the chat object. It’s important that I use the pollMessage() method instead of the nextMessage() method because the pollMessage method is non-blocking, it won’t wait until a message shows up from the person I’m chatting with, it returns immediately if no message exists. If the pollMessage() method returns a Smack Message object (which in Java will either return a Message or null), then I add the message to the conversation and finally display the conversation:

writeoutput("<html><head><title></title>");
writeoutput("<META HTTP-EQUIV='Refresh' CONTENT='1'>");
writeoutput("</head><body>");
writeoutput(#session.conversation#);
writeoutput("</body></html>");

You’ll notice that I’m having the iframe page refresh itself every 1 second, it would probably be better to use some JavaScript and a one pixel image to do the trick, but this works for now.

The last step is to create the page that holds the iframe and that presents the form for sending a message. The iframe is simple:

<iframe src="frame.cfm" name="chatwindow" id="chatwindow" width="800" height="500" marginwidth="5" marginheight="5"></iframe>

and then some code to handle a form post, retrieve the chat and connection objects from session scope, send the message to Jabber and then add the message to the conversation:

// if we have a form post
if (IsDefined("form.formPosted")) {
  // grab the connection and chat objects from the session
  connection = session.connection;
  chat = session.chat;
  // send the message via the chat object
  chat.sendMessage(form.message);
  // append the message to the conversation
  session.conversation = session.conversation & "<br /><strong><font color='red'>" & connection.getUser() & "</font></strong> : " & form.message;
}

Finally, a short form for entering the message:

<form action="#cgi.script_name#" method="post">
<input type="text" name="message">
<input type="submit" name="newmessage" value="Send Message">
<input type="hidden" name="formPosted" value="1">
</form>

That’s all there is too it!

You can download the source code for my examples here:

source code

I’d love your feedback on the code (if you use it) and I’d love to hear how you’re using instant messenging with ColdFusion, if you’re so inclined.

Screenshots:
NAnt build file tips

I found the documentation for NAnt to be lacking in build file examples, especially examples that deal with more than one task or include. If you’re completely new to NAnt, I’d suggest reading the article that Jeffrey McManus wrote for ondotnet. If not, read on.

One of the first things you’ll notice when reading examples on any site is that most of them are explicit in regard to the fileset to be compiled. You’ll see this:

<csc target="library" output="company.dll">
 <sources>
  <includes name="src\com\company\packagea\ClassA.cs"/>
  <includes name="src\com\company\packagea\ClassB.cs"/>
  <includes name="src\com\company\packageb\ClassC.cs"/>
....

instead of something like this:

<csc target="library" output="company.dll">
 <sources>
  <includes name="src\com\company\packagea\*.cs"/>
  <includes name="src\com\company\packageb\*.cs"/>
....

Of course, this means that you have to manually add in each namespace, which can be tedious and error prone. NAnt provides a shorthand: **, which means we can reduce the above to this:

<csc target="library" output="company.dll">
 <sources>
  <includes name="src\com\company\**\*.cs"/>
....

If you don’t want a particular file included in the list (say for instance all the files in ‘packageb’), you can use the <excludes> tag like so:

<csc target="library" output="company.dll">
 <sources>
  <includes name="src\com\company\**\*.cs"/>
  <excludes name="src\com\company\packageb\*.cs"/>

That’s all I had off the top of my head. There are a couple new features in release .84 that might be worth taking a look at: xmlpeek (which allows you to extract text from an xml file like say for instance the web.config), xmlpoke (which allows you to replace text in an xml file…) and servicecontroller (which allows you to stop/start/restart Windows Services).

Using Eclipse & NAnt

I’ve been using the Eclipse and NAnt together to write C#/ASP.NET apps for the last couple months, they’re relatively easy to get working together, but I thought I’d write it up for those who aren’t having such an easy time.

1) DownloadEclipse and NAnt from their respective download sites and install/unzip (you have to build nant). I’m also using the C# Improv plugin, which you can download here.

2) Create your project in Eclipse (not a Java project, use a Simple Project) and then create your XML build file and name it {your_project}.build. You can see a sample build file here.

3) With Eclipse open, click ‘Run –> External Tools –> External Tools’. You should see something like this:

Eclipse NAnt Integration

4) Give this instance of the external tool a name, I use something like ‘NAnt — My Project’. Enter the location of the NAnt executable (which should exist wherever you unzipped it too, something like C:\nant-0.8.3\nant-0.8.3.50105\bin\NAnt.exe). Finally, enter the working directory by clicking the ‘Browse Workspace’ button and selecting the appropriate project from the list of projects. Click the Run button at the bottom of the page and you should see the results of NAnt being displayed in the Eclipse Console.

To run the build process now, you simply click Run –> External Tools –> NAnt — My Project (where NAnt — My Project is the name you gave to this instance in step 4).