Category Archives: Systems Administration

Source Control with Subversion on Windows

We’re getting around to hiring an additional me at work so I needed to get a source control solution in place before he/she arrives and starts hacking away at the codebases. At the last place I worked we used Visual SourceSafe for a long time (which was pretty worthless) and then started using CVS, although not on the projects I worked on. A couple weeks ago I asked a bunch of questions about automating Java web application deployment and Erki suggested that I buy and read the Pragmatic Project Automation book, which I did and which I loved. I read it from start to finish (which isn’t an easy thing to do with a technical book) and took a ton of notes. Anyway, I’m pretty sure the book didn’t mention Subversion even once, but it did drill home the importance of setting up your code in source control and then doing your manual, scheduled, automated (using CruiseControl) or production builds directly from the source control system using Ant or Groovy, which led to alot of ideas about how you could automate builds to production Tomcat systems. I’ve heard alot about Subversion; it’s described as CVS with none of the warts and all of the features, so I tried it out. Following are the notes I kept during the installation process. Hopefully this helps out someone somewhere down the road:

a) Download Subversion (obviously) I downloaded version 1.1.1 ( svn-1.1.1-setup-2.exe)

b) Run the install. I chose to install to c:\subversion\.

c) Test the Subversion install by going to the install directory and then going to the /bin directory. Run the svnadmin from the command line:
CD c:\subversion\bin\
svnadmin

If you get an error that says that says “svnadmin.exe – Unable To Locate DLL”, you’ll need to either a) install the Visual C++ 6.0 VCREDIST.exe, which is available here (but only if you’re using Windows 98 or Windows ME) or b) find someone or some system that has msvcp60.dll and copy that file to c:\$windows\system32\ (where $windows is the directory that contains your Windows installation).

d) Create a repository on the machine that is going to host your source code. From the command line on the server machine:
svnadmin create d:\$projects\$projectname

where $projects is the name of a folder that will contain all your Subversion source code repositories and $projectname is the name of the specific project you’re going to create a repository for.

e) Start the server either from the command line:
svnserve -d -r d:\$projects

or use the SVN Service Wrapper (http://dark.clansoft.dk/~mbn/svnservice/), note that the r switch limits directory browsing by specifying the root of your repositories.

f) Create a users database (which is nothing more than a text file, I created a file called users.conf) and save it in the d:\$projects\$projectname\conf directory and then add your usernames & passwords. An example user database might look like this:[users]
aaron = mypassword

g) Within the d:\$projects\$projectname\directory, open the conf/svnserve.conf file using your text editor of choice and add the following to allow reading and writing to the users in the database we just created:
[general]
anon-access = none
auth-access = write
password-db = users.conf
realm = $projectname

where $projectname is the name of the project you’re setting up and users.conf is the name of the file you created in step f.

h) Finally, restart the server and you’re ready to start using the client and import your project.

i) To import an existing project, invoke the svn executable from the command line on the client:
svn import c:\temp\myproject svn://myserver/myproject -m "initial import" aaron mypassword

where c:\temp\myproject is the directory that contains the existing project you want to import (and should have 3 folders: trunk, tags and branches, your source code should be in the trunk folder; more on repository layout here), myserver is the name of the server that contains the Subversion repository you created in step d, myproject is the name of the project (ie: $projectname from step d) you’re importing into, the m switch signifies the message you want to tag this import with, followed by the username and password you setup in the users database in step f.

j) Finally, checkout the project from the server (invoking the svn executable from the directory that you want the trunk checked out from…, ie: c:\projects\myproject)
svn co svn://myserver/myproject/trunk . aaron mypassword

k) To add, move, delete, or edit and then commit any changes back to subversion:
Add: svn add src/myfile.java -m "adding a file"
Move: svn move src/myfile.java src/mynewfile.java -m "moved myfile.java to mynewfile.java"
Delete: svn delete src/myfile.java -m "removing a file"
Commit: svn commit src/myfile.java -m "the message"

That’s it… there’s a alot more to read. One of the coolest things about Subversion is that the documentation is all packaged up into a free PDF published by Oreilly, which you can download here. I printed out the manual and breezed through it in a couple hours. You should too.

I did try to get the Subclipse Eclipse Subversion plugin working, but for the life of me… I couldn’t. I think it ended up for the better anyhow because while the command line is a bit more tedious, I understand more about what’s going on in the system, which is helpful. I’d recommend that you get familiar with the command line client before attempting to use a GUI plugin.

After you’re all set with Subversion and you’re ready to get started with CruiseControl, note that while Cruisecontrol contains an <svn> tag, you still need to drop down into command line mode in Ant to checkout / update your local repository when doing an automated build. For example:
<exec executable="svn">
  <arg line="update"/>
</exec>
Automating Application Deployment with Tomcat

I’m asking a bunch of questions here so if you’re expecting answers, look elsewhere. In the past couple years, I’ve waded through a bunch of different ways to configure and build Java web applications. At first, I hardcoded connection strings, settings and message strings in the source code, compiled using Eclipse and copied over the JSP and class files to the web server (lame, I know, but you gotta start somewhere). As the applications I wrote got more complex and as I got smarter, I started using Ant to perform the build and I learned about properties files and web.xml. After unpacking alot of other open source Java applications, I’m now using log4j for logging and error messaging, JNDI for configuration (datasource and application configuration stored in Tomcat’s server.xml), resource bundles for storing internationalized message strings, JUnit for running tests and Ant for cleaning, testing and building my apps into a deployable format (war files).

And that’s where it stops being easy. Deployments suck. We have a pretty small environment (a couple test servers, a couple staging servers, a couple live servers) and deploying changes to those servers is tedious. For example, in my development environment, I like to have log4J append any and all information to the console, which lets me watch the system as it starts up and runs:

log4j.category.com.mycompany=INFO, STDOUT

But once I build the application and deploy it to the live environment, I only want error messages and I want them sent to the SMTPAPPENDER:

log4j.category.com.mycompany=ERROR, SMTPAPPENDER

so I’m stuck editing a text file every time we deploy an application. It’s not that big a of a deal, but I also have applications on each server that need to have the appropriate entries in Tomcat’s server.xml (environment entries, JDBC connections, etc..), sometimes Tomcat needs to be restarted after your deploy the war, applications are deployed to different directories on different machines, sometimes the application being rolled out doesn’t work and you need to roll back to the previous version, how do you keep track of all the live / staging / development servers? The environment I work in is pretty small, so all of this can be done by hand, but it’s tedious, boring and error prone. How do you guys that work in larger environments do it? How do you move the .war files from your staging environment to the live environment? Using Ant? Do you trigger Ant tasks on the live servers that check out source code from CVS and build the apps there? Do you restart Tomcat every time? Do you do one half of your machines at a time and then the next half? You can’t be doing this by hand! Any tips?

ASP.NET: The View State is invalid for this page and might be corrupted

I fixed a tricky bug yesterday on one of our sites that runs ASP.NET. Like all good webmasters, anytime a 500 error occurs on the site, an email is sent to me that contains all the juicy details: the URL the user was visiting, the date/time, what browser they were using, which server in the cluster it occured on, the stack trace, any form variables, the querystring, session variables, and cookies. This particular error would occur on any page with a form and the stack trace would look like this:

Exception of type System.Web.HttpUnhandledException was thrown.
source = System.Web
target site = Boolean HandleError(System.Exception)
stack trace = at System.Web.UI.Page.HandleError(Exception e) at
System.Web.UI.Page.ProcessRequestMain() at
System.Web.UI.Page.ProcessRequest() at System.Web.UI.Page.ProcessRequest(HttpContext context) at System.Web.CallHandlerExecutionStep.System.Web.HttpApplication+IExecutio
nStep.Execute() at System.Web.HttpApplication.ExecuteStep(IExecutionStep
step, Boolean& completedSynchronously)

which isn’t very helpful at all. So my first problem was that I wasn’t getting enough information; I couldn’t tell what the problem really was. The HttpModule that I wrote that listens for Application_Error events was retrieving the exception using this code:

HttpApplication application = (HttpApplication)source;
Exception error = application.Server.GetLastError();

which technically does retrieve the error that caused the event, but I was missing one key step: the last line should have read:

Exception error = application.Server.GetLastError().InnerException;

and once I fixed that, I magically started receiving a much richer error description:

System.Web.HttpException: The viewstate is invalid for this page and might be corrupted. at System.Web.UI.Page.LoadPageStateFromPersistenceMedium() at System.Web.UI.Page.LoadPageViewState() at System.Web.UI.Page.ProcessRequestMain()

That description leads to a couple different knowledge base articles on support.microsoft.com; Q323744 and Q312906 were the ones that fixed the problem I was experiencing. Turns out that when you a) run an ASP.NET application in a cluster (in my case it’s an ASP.NET application load balanced behind with an F5), b) don’t use sticky sessions, and c) utilize view state, you must setup your web servers to use the exact same machine key, which is a setting in machine.config. Microsoft supplies a C# script that will generate the appropriate machineKey element for you machine.config in Q312906.

Getting IIS 5.x & Tomcat 5.x to play nice

Just for posterity’s sake, directions on how to get IIS 5.1 (ie: Windows XP Professional) and Tomcat 5 to play nicely. The directions assume that you have Tomcat 5.x and IIS 5.x installed and functioning.

a) Download Tomcat Web Server Connector JK 2 (download)

b) extract the isapi_redirector2.dll to the bin directory of your Tomcat installation.

c) add a Virtual Directory in IIS called ‘jakarta’. Point the Local Path to the bin directory of your Tomcat installation (on my system this is: C:\Program Files\Apache Software Foundation\Tomcat 5.0.25\bin\). Give the Virtual Directory Scripts & Executables execute permissions.

d) Create 2 text files in the /conf/ directory of your Tomcat installation called workers2.properties and jk2.properties. Here is a sample workers2.properties:

[channel.socket:localhost:8009]
info=Ajp13 forwarding over socket
tomcatId=localhost:8009
[uri:/samples/*]
info=Map the /samples director

You’ll need to add anything you want mapped from IIS to Tomcat to the [uri:/yoursite] section. Here is a sample jk2 properties file:

# The default port is 8009 but you can use another one
# channelSocket.port=8019

e) Edit your registry: 1) Create a key: HKLM\\SOFTWARE\\Apache Software Foundation\\Jakarta Isapi Redirector\\2.0. 2) Add string values for (no apostrophes) ‘extensionUri’, ‘serverRoot’, ‘workersFile’, ‘authComplete’, and ‘threadPool’. 3) Update the string values for extensionUri to be ‘/jakarta/isapi_redirector2.dll’, serverRoot to be the root of your Tomcat installation (on my system this is ‘C:\Program Files\Apache Software Foundation\Tomcat 5.0.25′), threadPool to be ’20’, and workersFile to be the location of your Tomcat installation + ‘conf\workers2.properties’ (which on my system turns out to be this: ‘C:\Program Files\Apache Software Foundation\Tomcat 5.0.25\conf\workers2.properties’.

f) Restart IIS and Tomcat and you should be golden!

Microsoft Log Parser in action

I mentioned Microsoft Log Parser a couple months back but never had a chance to actually use it until last Friday when my boss needed to know exactly how many times a certain type of file had been acccessed on our cluster of web servers since the beginning of the year. We have Webtrends, but from what I’ve seen of it, it’s made for presenting a 30,000 foot view of a website, not for getting granular information about a specific URL or subset of a URL. In addition, WebTrends typically breaks down reports into weekly or monthly views, which again was not what I needed in this case.

To make a long story short, after downloading and installing Log Parser, the command line argument to get what I needed into a CSV file (called result.txt in {installation dir}\result.txt) was this:

> logparser "select distinct cs-uri-stem, count(*) FROM D:\logfiles\*.log TO result.txt WHERE cs-uri-stem LIKE '/images/mydir/%.swf' GROUP BY cs-uri-stem" -i:IISW3C -o:CSV

I’ll unzip that a bit. ‘logparser’ is executable you’re running from the command line; make sure that you CD to the directory where LogParser.exe lives (for me it was C:\program files\log parser\LogParser.exe). The second part is the SQL query:

  • cs-uri-stem is one of the approximately 33 fields available in the IISW3C log file format,
  • distinct and count() are just a couple of the many SQL functions that Log Parser supports
  • D:\logfiles\*.log indicates the path to the log files that I want to query (and acts much like a database table as far as SQL goes
  • TO result.txt is the endpoint to which I want to pipe the results, you can omit this and have the results printed directly to the command line, I needed the data piped to a file
  • WHERE .. notice that Log Parser supports the LIKE keyword and also the GROUP BY keyword
  • and finally the -i switch indicates the format of the log files I’m analzying and -o is the format that I’d like the results printed too.

There were a couple of things that initially stumped me. First, it doesn’t appear (again from trial and error) that Log Parser can handle zipped log files, so I had to unzip all the log files, which could have caused a problem since a zipped log file in our environment is usually about 3MB and unzipped can get up to 200MB (this is per day… and I needed the last 6 months). Luckily in this case I had enough disk space but next time I might not have enough room. Second, it seemed that Log Parser attempted to guess at the format of the log file the first time I ran it, but on the second go around, it required that I specify the log file format using the -i command line switch.

All said and done, I’d highly recommend that you add Log Parser to your tool belt. I didn’t even mention that it can export to a variety of formats (W3C formatted text files, IIS log format text files, directly to a database, XML, CSV, or even your own custom log file format) or that it can be scripted using the included LogParser.dll. If you’re curious, download it now and then dive into the included documentation (LogParser.doc).

PGP Encryption using Bouncy Castle

It can’t be that hard. So given a couple hours of hacking with the library, here’s a fully illustrated example that shows how to encrypt a file using the Bouncy Castle Cryptography API and PGP. First, giving credit where credit is due, the example comes mostly from the KeyBasedFileProcessor example that ships with the Bouncy Castle PGP libraries. You can find it in the /src/org/bouncycastle/openpgp/examples directory if you download the source. I’ve simply unpacked the example a little, providing some pretty pictures and explanation of what the various pieces are.

As in any example, you need to have downloaded a couple libraries; in this case you need to visit http://www.bouncycastle.org/latest_releases.html and download the bcprov-jdk14-122 and bcpg-jdk14-122 jar files. Add those to your project, as in this example, simply make sure to add them to the classpath when running the example from the command line.

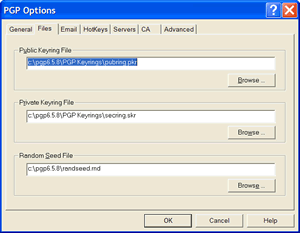
Next, while you don’t need to have PGP installed, you do need to have a at least one public keyring file available on your system. I’m using PGP 6.5.8 on Windows which automatically saves my public keyring for me. You can find the location of the keyring file by Edit –> Options –> Files from within the PGP Keys window. You should see something like this:
PGP Options
Note the location of the Public Keyring File.

Second, you’ll need to generate a keypair (if you don’t already have one). I won’t go into the how or why (I assume you know the how and why) but you do need to make sure that you create what the Bouncy Castle folks call a ‘RSA key’ or ‘El Gamal key’ (source) rather than a DSA key. If you try to use a DSA keypair (which I’m assuming is synonomous with Diffie-Hellman/DSS?), that I ran into:
org.bouncycastle.openpgp.PGPException: Can't use DSA for encryption, which again is explained by the link above.

Now that you downloaded the appropriate libraries, created an RSA keypair and located your public keyring file, we’re ready to start. Open up your favorite Java IDE (I’m using Eclipse) and start by importing the appropriate libraries:

import java.io.*;
import java.security.*;
import org.bouncycastle.bcpg.*;
import org.bouncycastle.jce.provider.*;
import org.bouncycastle.openpgp.*;

I took a shortcut above and didn’t specify exactly what classes I wanted to import for clarity, if you’re using Eclipse you can easily clean that up by selecting Source –> Organize Imports (or by downloading the source code at the end of this example). Next the class declaration and the standard public static void main etc.. The KeyBasedFileProcessor example on the BouncyCastle website lets you pass in the location of the public keyring and the file you want to encrypt, I’m hardcoding it in my code so that it’s crystal clear what everything is:

// the keyring that holds the public key we're encrypting with
String publicKeyFilePath = "C:\\pgp6.5.8\\pubring.pkr";

and then use the static addProvider() method of the java.security.Security class:

Security.addProvider(new BouncyCastleProvider());

Next I chose to create a temporary file to hold the message that I want to encrypt:

File outputfile = File.createTempFile("pgp", null);
FileWriter writer = new FileWriter(outputfile);
writer.write("the message I want to encrypt".toCharArray());
writer.close();

Read the public keyring file into a FileInputStream and then call the readPublicKey() method that was provided for us by the KeyBasedFileProcessor:

FileInputStream in = new FileInputStream(publicKeyFilePath);
PGPPublicKey key = readPublicKey(in);

At this point it’s important to note that the PGPPublicKeyRing class (at least in the version I was using) appears to have a bug where it only recognizes the first key in the keyring. If you use the getUserIds() method of the object returned you’ll only see one key:

for (java.util.Iterator iterator = key.getUserIDs(); iterator.hasNext();) {
System.out.println((String)iterator.next());
}

This could cause you problems if you have multiple keys in your keyring and if the first key is not an RSA or El Gamal key.

Finally, create an armored ASCII text file and call the encryptFile() method (again provided us by the KeyBasedFileProcessor example:

FileOutputStream out = new FileOutputStream(outputfile.getAbsolutePath() + ".asc");
// (file we want to encrypt, file to write encrypted text to, public key)
encryptFile(outputfile.getAbsolutePath(), out, key);

The rest of the example is almost verbatim from the KeyBaseFileProcessor example, I’ll paste the code here, but I didn’t do much to it:

out = new ArmoredOutputStream(out);
ByteArrayOutputStream bOut = new ByteArrayOutputStream();
PGPCompressedDataGenerator comData = new PGPCompressedDataGenerator(PGPCompressedDataGenerator.ZIP);
PGPUtil.writeFileToLiteralData(comData.open(bOut), PGPLiteralData.BINARY, new File(fileName));
comData.close();
PGPEncryptedDataGenerator cPk = new PGPEncryptedDataGenerator(PGPEncryptedDataGenerator.CAST5, new SecureRandom(), "BC");
cPk.addMethod(encKey);
byte[] bytes = bOut.toByteArray();
OutputStream cOut = cPk.open(out, bytes.length);
cOut.write(bytes);
cPk.close();
out.close();

One last thing that I gleamed from their web-based forum was that one of the exceptions thrown by the above code is a PGPException, which itself doesn’t tell you much (in my case it was simply saying exception encrypting session key. PGPException can be a wrapper for an underlying exception though, and you should use the getUnderlyingException() method to determine what the real cause of the problem is (which lead me to the Can't use DSA for encryption message that I mentioned above).

You can download the source code and batch file for the example above here:

bouncy_castle_pgp_example.zip

Updated 04/07/2004: David Hook wrote to let me know that there is a bug in the examples, I updated both the sample code above and the zip file that contains the full source code. Look at the beta versions for the updated examples.

IE Greeting Card Exploit Post Mortem

From the interesting people list back a couple weeks ago, an analysis of an E-card hijack spam.

I downloaded a.exe out of curiousity, and have been analysing it. The file contains a number of very interesting strings, which make it quite obvious that this program attempts to hijack the user’s personal login information as they log in to various popular Internet banking services.

This article scared me into using Firefox.

Web Server Log Parser

From Dominic @ fusetalk, the IIS Log Parser tool:

Log Parser 2.0 is a powerful, versatile tool that makes it possible to run SQL-like queries against log files of almost any format and produce the desired information either on the screen, in a file of any desired format or into a SQL database. Log Parser is available as a command-line tool and as a set of scriptable COM objects.

Related:

Forensic Log Parsing with Microsoft’s LogParser